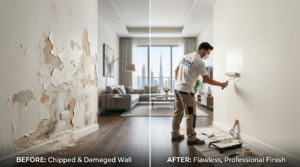
Chipped paint on walls is something almost every Dubai resident deals with at some point. Door edges, hallway corners, walls near AC units, and surfaces around light switches are the spots that chip first and most often. Small to medium chips are straightforward to fix without repainting an entire room, and the process does not require specialist skills or expensive tools. What it does require is the right sequence of steps carried out in the right order, which is where most DIY attempts go wrong.
Why Paint Chips in Dubai Homes
Paint chips for three main reasons in UAE properties, and knowing which one applies to your walls tells you whether a simple repair is the right response or whether a more complete solution is needed.
- Physical impact is the most visible cause. Door handles hitting walls, furniture being moved, and everyday contact with hallway surfaces all cause chips over time. These are isolated incidents and respond well to a targeted repair approach.
- Moisture from AC condensation or minor plumbing leaks is a more serious cause. When moisture sits behind a painted surface, it weakens the bond between paint and wall and causes sections to lift and chip without any physical impact at all. If you notice chips forming near AC vents, around window reveals, or close to bathroom walls, moisture is likely involved.
- Poor surface preparation during the original paint job is the third cause. Paint applied to unprimed gypsum walls, or applied over dust and grease without cleaning, creates weak adhesion points that chip easily within the first year.
- If chips are appearing across multiple walls simultaneously, this is almost certainly a preparation issue from a previous job rather than an isolated incident. In this situation, a full interior repaint with proper preparation is more cost-effective than patching chips one by one.
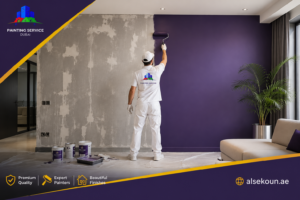
The Alsekoun interior painting team carries out full surface preparation including crack and chip repair, priming, and two-coat application as standard on every project.
What You Need Before You Start
Gathering the right materials before starting saves you from stopping mid-repair and going back to the hardware store. All of the items below are available at ACE Hardware, Home Box, and most building material suppliers across Dubai.
You will need a putty knife or paint scraper, fine sandpaper in 180 and 220 grit, a wall filler or spackle compound, PVA primer or the original wall primer, the original paint or the closest available colour match, a small brush or foam roller, and clean cloths for dust removal.
Step-by-Step Repair Guide
Each step prepares the surface for the next. Skipping any one of them is the main reason repairs remain visible after painting.
Step 1: Inspect the Chip and Surrounding Wall
Press gently on the paint surrounding the chip before touching it. If the edges lift slightly under gentle pressure, more paint is about to come off and you need to continue removing it before filling. If the surrounding edges feel solid, you have an isolated chip.
- Look for moisture staining, yellow rings, or dampness near the chip
- If any moisture signs are present, fix the source before proceeding
- Painting over a moisture-affected area causes the repair to fail quickly
Step 2: Remove All Loose Paint
Hold the putty knife at a shallow angle against the wall and gently scrape away all loose paint around the chip. Work from the outer edges toward the centre and remove everything that lifts without force. Leaving loose paint under filler causes the repair to fail as the loose paint continues separating from the wall.
- Use a stiff wire brush to clear smaller flakes from inside the chipped area
- Stop when surrounding edges feel firm and nothing more lifts under moderate pressure
- Do not force the scraper and risk gouging the plaster beneath
Step 3: Sand the Edges Smooth
Use 180 grit sandpaper to sand the chip edges so they transition smoothly to the surrounding wall surface. Sharp hard edges create a visible ridge under the topcoat that shows even after painting leaving the surface looking uneven and patchy. Feather the sanding several centimetres outward beyond the chip edge.
- Wipe away all dust with a clean damp cloth after sanding
- Let the area dry completely before applying filler
- Run your finger across the sanded edge to confirm there is no sharp step
Step 4: Fill the Chip
Apply wall filler to the chipped area in a single smooth stroke using the putty knife. Press firmly to fill the recess completely and level the filler flush with the surrounding wall. For deeper chips, apply two thin layers rather than one thick one.
- Allow each layer to dry fully before applying the next
- Sand lightly with 220 grit paper once fully dry until completely flush
- Run your fingers across the repair. You should not feel any edge where the chip was
Step 5: Prime Before Painting
Apply a thin coat of PVA primer over the filled area and extend it a few centimetres onto the surrounding wall. This step is non-negotiable on Dubai gypsum walls. Without primer, the filler absorbs the topcoat at a different rate from the sealed surrounding surface and the repair shows as a visible dull or shiny patch even after two colour coats.
- Allow primer to dry fully before applying paint
- Use the same primer as the original job where possible
- Extending primer slightly beyond the repair helps blend the topcoat transition
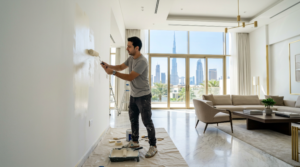
Step 6: Apply the Topcoat
Use the original paint or the closest available colour match in the same finish. Apply with a small brush or foam roller using light, even strokes. Extend slightly beyond the primed area to blend the edges into the surrounding wall.
- Apply two thin coats, allowing the first to dry before the second
- Check the repair in both natural and artificial light to confirm the colour match
- View under raking light to confirm the surface is flush and even
When to Repaint the Full Wall Instead
Repairing individual chips is the right approach when chips are isolated, the surrounding wall is in good condition, and the original paint colour is available for a close match. It stops being the right approach in three situations.
First, when chips are appearing across multiple sections of the same wall or in several rooms simultaneously. This signals a preparation failure in the original paint job, and individual repairs will keep failing until the full surface is properly addressed. Second, when you cannot find or match the original paint colour accurately.
A visibly mismatched patch is more noticeable than the original chip and reflects poorly on the property, particularly important if you are preparing for a landlord inspection. Third, when the wall is already showing other signs of age including fading, scuffing, and general wear. A full repaint at this point is better value than multiple targeted repairs.
For tenants preparing apartments for handover in Dubai, theAlsekoun move-out painting service covers chip repair, full surface preparation, priming, and two-coat application as a complete package built around Dubai property handover standards. For villa owners addressing chips as part of a wider interior refresh, the villa painting service from Alsekoun includes room-by-room surface assessment before any painting begins.
Frequently Asked Questions
Can I paint directly over a chipped wall without filling?
No. Painting over an unfilled chip creates a visible dip in the surface that remains visible through the topcoat. The chip needs to be filled, sanded flush, and primed before painting.
What filler works best on Dubai gypsum walls?
Ready-mixed spackle or plaster-based wall filler work well on gypsum walls. Avoid cement-based fillers for interior repairs as they dry harder than the surrounding material and crack when the gypsum wall flexes.
How long does wall filler take to dry in Dubai?
In an air-conditioned Dubai room, standard wall filler dries in 30 to 60 minutes. Allow a full hour before sanding and at least two hours before applying primer over it.
Why does my repaired patch still show through the paint?
This almost always means primer was skipped or the filler was not sanded completely flush with the surrounding wall. Sand the patch flat, apply primer, and apply two thin topcoats to resolve it.For professional wall repairs, chip fixing, and full interior painting across Dubai apartments and villas, visit Alsekoun or contact the team for a free site inspection.